Monday 17 June 2013

Revitalise The Hidden Pantry

<a href="http://www.bloglovin.com/blog/8379233/?claim=v99btkf8eh4">Follow my blog with Bloglovin</a>

Pantries are one of the most requested features in kitchens today, despite wanting to have larger kitchens than ever before. Whilst having nostalgia and practical purpose to the pantry, they are becoming bigger, better organised and more creative. 

Below are various pantries with different designs and tips for better organisation.


Having your pantry organised makes you
 life a lot easier when locating ingredients 
whilst cooking. Labelling the
containers makes a huge difference too.


Some Tips:

Store the main meals on eye level shelves
 so they can easily be reached when in a rush.

- Place oils and vinegars on a spill proof mat.

- Put a small ladder or Step-Up on the bottom
shelf instead of having a ladder to reach up to
the top shelves and being in the way as you
walk past.

Some tips:
- Store Dry ingredients in airtight containers to keep the freshness in and the bugs out.

-If you have any flour, oats or muesli put a bay leaf in the container so that moths are not attracted to the ingredient.  


This pantry is along one wall of country house.
They have chosen to use jars for all of their 
spices,condiments and dry foods. 

If you are mixing your pantry cabinetry,
remember to keep your shelves shallow so your
items dont get lost behind each other.
It will make it easer to find your ingredients.


When I found this image I loved the idea. 
These dry foods are used in the majority 
of meals. Kept in draws in a wooden basket
under neath the kitchen working space is a
great idea. They are easy to reach and put back
Dry vegetables like onions, garlic, sweet potato and
pumpkin are best  to be kept in dry, cool place
and not in the refrigerator.  


Some Tips:
One of my favourite things about pantries
is the colour and the organisation.
Having creative labels, painted interiors,
shelves, bold colours, boxes, baskets, containers
and easy to reach makes the pantry far more useful.


I  love the idea and layout in this pantry.  
It is well designed as the fruit and dry foods 
are all together in baskets down the bottom.
Having them in open baskets allows the fruit to
ripen and easily distinguish which is what. The
wine is placed in the pantry where it is dry and cool.
Easily accessed cook books that are on display.
I love the how to colour palette is mainly 3 different
tones of brown and the books, fruit and spices add 
various colours to the pantry. 


gvhgh


Good Lighting is essential in this space. It is a small area with no windows, making sure you dont have any dark spots. Shelf lighting is a great option as you can have certain parts of the pantry. Lighting in darker and higher corners are a must. Having a feature pendant in the pantry can be a great addition.

If you are thinking of having microwaves and pizza maker etc. It is important to have easy access to open and close doors. Make sure it is not obstructing anything and easy access to power points. Allowing enough space around the appliance for the heat to escape.


Some Tips:
If you have glass cupboards, try and 
use these tips and images to rearrange your 
pantry. It will appear more presentable and
you will love showing of your new pantry to
everyone. Putting the spices and jars in the 
glass cupboard is a good idea as they are be 
grouped and are mostly the same heights 
which will also help. 


Here they have added their own 
personality in their pantry It is a small 
space with traffic coming in and out.
Wallpaper is easy and an effective way to

'upbeat' your pantry. When Friends and
family walk into the space it would be a surprise. 


Now this is a very organised spice pantry. Pantry is an essential part of the kitchen and it needs to have a good set out for it to be beneficial. This pantry is just a crockery  cupboard that has been transformed into a pantry. It is placed in a good position as the doors do not open to any obstructions and there is stil enough space so more then 1 person can be in the same space. If it is near corners or other doors it can become hard to move around the space. 

Tuesday 28 May 2013

DIY Recycled Light Pendants

After visiting plenty of lighting stores trying to find a present for my mother for her birthday, I was overwhelmed by the vast range of decorative fittings in each shop. However, I did not find the type of light that I was looking for. So, I decided to create a decorative pendant light myself. I have chosen some of my favourites and posted them below, with some instructions on how to make them. 


Lighting is like jewellery, as it can make the final touch to an amazing outfit or as in the interior aspect, a key aspect within your decor space. 


Got a day to do nothing, or a fun activity?
These DIY lights below only take a couple of hours to complete.


A great way to update the appearance of your home is for renewal of interior lighting. By creating a bold pendant, lamp or chandelier, creates a new atmosphere to your surroundings.

This is a little fun and colourful project using ping pong balls and food colouring to create a playful pendant light. 
- Fill a bowl with 3/4 full of water and put a few drops of food colouring into the bowl. Place the pingpong balls in and dry with papertowel. (30 balls per 6 rows)
-Drill small hole with needle into opposite end of each ball. Using nylon thread make garland knots one end first then pulling thread through each ball.
-Tie the wire up against the last ball then attach to the lampshade structure.
-Repeat with each row and hang from a pendant light string


Pendant Lighting is a sophisticated lighting solution ideal for illuminating large spaces. Pendant Lighting provides visual appeal by day and unique design features by night. 

You need: 1 gym ball,2x balls of cooking twine, gloves, PVA glue, pendant light.
-Start to glue your twine and simply start randomly placing the string firmly around the balloon in different directions.
-Spread some more glue evenly if required.
-Spray with fabric stiffener to make the string stiff.
-Cut a hole in the top of the ball and deflate the ball, pull the ball out and replace with an old lamp fitting
-Place the pendant light and attach to ceiling


Whilst living on a farm for most of my life I found old glass bottles, broken plates, picture frames, wooden planks, lots of wire and animal bones. Most weekends my brothers and sister would drive around the farm searching for 'treasure' and create new creations e.g, chairs, lights, chandeliers, boxes, or mosques on pipes to put in the garden. 


This is wine bottle chandelier, using parts of a wine barrel, wine bottles, light bulbs on a string. 
Laser cut the bottom of the bottles on an angle. having the bottom open allows you to fit the light fitting and bulb. 

This faceted paper pendant light is definitely in my top favourite list ever. This not only looks amazing with the lights off, it looks incredible when the light is on too. I remember making these when I was a little kid and colouring them in and writing silly things inside. Being round you would think the light would be obstructed but it doesn't. The difference in density of the paper folded gives a various visibility of lighting as well as an visual effect on the walls and ceilings.
This one is a lot more time consuming then the other lights but its definitely worth it.


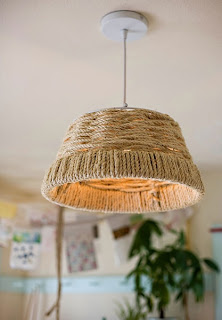
Reusing different objects from around your home can enjoyable and inspiring. Here, a old woven basket has been used as a pendant. It is extremely simple and quick, yet looks very effective and unique.


You just need any woven basket or any basket of your choice..
Get a light fitting and cut an exact hole in the top.
=) you got yourself the easiest pendant light.

These thick brown string pendants really make a statement within the space. They definitely are the focal point. I thought this would be great in our house because we live on a farm and our house reflects country living.

The steps to making this is pretty much similar to the picture with the white string.. (four pictures above)


This tree branch is a great decorative pendant to put on display outdoors during Spring or Summer as it creates a fairy land atmosphere. Great with sunsets, drinks, cheese, wine and friends.

It is an easy DIY light. All you need is an umbrella frame spray painted white with Christmas lights twisted and drapes on each arm. 
The best option is to chose Christmas lights with a battery operated box as you dont have to put cords through the roof or use extension cords.


★HAPPY LIGHT MAKING★

http://interiorattack.blogspot.com.au/2013/05/diy-recycled-light-pendants.html